

How to Fix a Running Toilet - DIY Guide
- Dec 2, 2025
- 3 min read
A running toilet is one of the most common (and most annoying) plumbing issues homeowners deal with. The good news? It’s usually an easy DIY fix—no special tools required. In most cases, a running toilet is caused by a worn-out flapper, a stuck float, or a faulty fill valve. Here’s a clear, step-by-step guide to help you diagnose and repair the problem so you can stop wasting water and money.
1. Start With a Quick Diagnosis
Before you replace anything, identify what’s causing the toilet to run.
Check inside the tank:
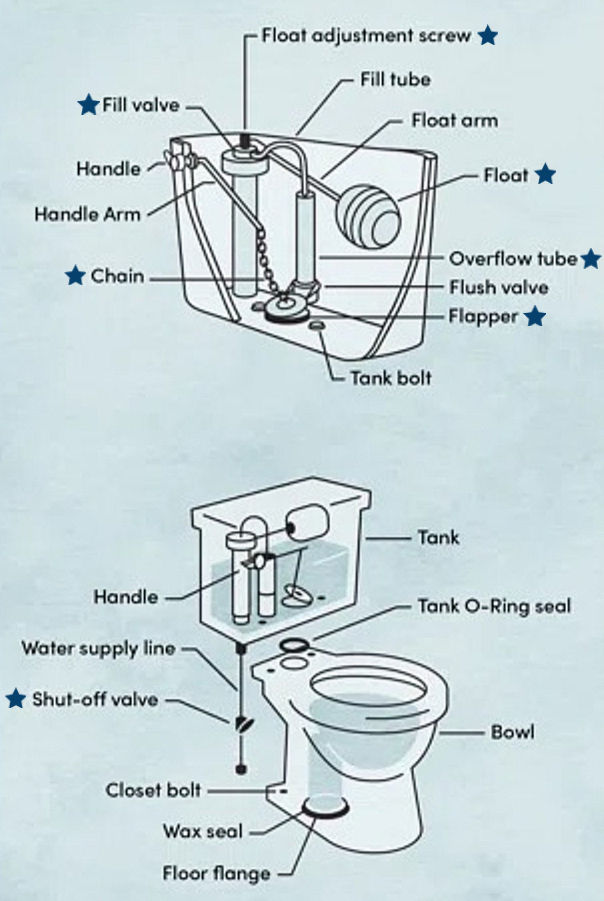
Remove the lid and look at the flapper, chain, fill valve, and float.
Listen for the sound of water trickling—it usually points directly to the issue.
Common signs:
Water constantly flowing into the bowl
Toilet tank filling slowly or never stopping
Hissing or dripping sound from the fill valve
2. The Most Common Fix: Replace the Flapper
A worn or warped flapper is the number 1 cause of a running toilet. Over time, rubber breaks down and no longer seals properly.
How to replace it:

Turn off the water shut-off valve behind the toilet.
Flush the toilet to empty most of the water.
Disconnect the chain from the old flapper.
Unhook the flapper from the overflow tube.
Clip on the new flapper and reconnect the chain.
Turn the water back on and test for a proper seal.
Tip:
Make sure the chain has a little slack. Too tight = the flapper won’t close. Too loose = it won’t lift properly.
3. Adjust the Float Level (If the Toilet Overfills)
If the toilet is running because the tank overfills and water spills into the overflow tube, the float level is too high, or it is getting stuck.
How to fix it:
Is the float getting stuck? In some cases the float on a cup type can get stuck on the fill valve due to sediment build up or debris. If your float is under water when the tank is filled your float is getting stuck. Try cleaning the area to free it up.
To adjust a float cup: turn the plastic screw on top of the fill valve to lower the float. This can usually be done by hand without tools.
To adjust a ball float: turn the screw on top of the fill valve to lower the float. This will typically require a screw driver. If you have an old float without an adjustment screw you can slightly bend the arm of the float downward.

The water level should sit about 1 inch below the top of the overflow tube.
4. Clean or Replace the Fill Valve
A fill valve can wear out over time or get clogged with sediment, especially in hard-water areas. Ball type float and fill valves are not commonly available anymore. If you need to replace the fill valve you can switch it to a cup type.
Try cleaning it first:

Turn off the water.
Remove the cap of the fill valve.
Rinse debris and mineral buildup.
Reassemble and test.
If the valve still won’t shut off properly, replace it. Most replacements are inexpensive and easy to install.
For a more in depth guide on replacing a fill valve click the button below.
5. When to Call a Pro
While most running toilet fixes are DIY-friendly, call a professional if:
The toilet continues running after replacing the flapper and fill valve
You see cracks inside the tank
The shut-off valve won’t turn or begins leaking
A small repair can prevent bigger plumbing problems later.

